Saturday, September 5, 2015

DB2 INSTALLATION AND UNINSTALLATION WITH RESPONSE FILES

DB2 INSTALLATION AND UNINSTALLATION WITH RESPONSE FILES

Environment:

OS: Redhat 6.6
DB2 : V10.1 

Response file:

Response files contain values that are used to answer questions during the installation process that you would normally answer.

Response files can install,add functionality, uninstall DB2 products.

You can use response file created only for the version it is created not with other versions.

On Linux or UNIX platforms, a response file created for a root installation might not be usable for a non-root installation.

You can use a response file to install an identical configuration across every workstation on your network or to install multiple configurations of a DB2 database product. You can then distribute this file to every workstation where you want this product to be installed.

How to create a response file:

Three ways:

1. Using db2setup wizard.
2. Using sample response files provided in db2/<platform>/samples from where you extracted the db2 installation files. Example: If DB2 is extracted in /root/ then go to server/db2/linuxadm64/samples here you will find lots of response files.
3. Manually creating a response files by using response file keywords provided in the information center.

A response file is an English-only text file that contains setup and configuration information.

A response file installation can also be referred to as a silent installation or an unattended installation.

You can use a response file to uninstall one or more DB2® database products, features, or languages. A response file uninstall can also be referred to as a silent uninstall or an unattended uninstall.

On Linux and UNIX operating systems, you can also use a response file to uninstall the DB2 Information Center.

A sample uninstall response file, db2un.rsp, is provided.

When the DB2 database product was installed, as part of the installation the sample uninstall response file is copied to DB2DIR/install.

If multiple DB2 database products exist within the same DB2 copy, a response file uninstallation of one DB2 database product does not affect the components shared by other DB2 database products in that copy.

NOTE:

If a DB2 feature is installed by multiple products in the same DB2 copy, a response file uninstallation of the feature removes the feature from all of the products in the DB2 copy.

Checking after uninstalling:

After a response file uninstall, check the log file. This file captures all DB2 uninstallation information, including errors.

On Linux and UNIX operating systems, the log file is located in /tmp/db2_deinstall-nnnnn.log where nnnnn are generated numbers. The log file name displays on the screen after running the db2_deinstall command. You can also verify the product, feature, or language was removed using the db2ls command.

On Windows operating systems, the log file is located in My Documents\DB2LOG\db2un-TimeStamp.log. You can verify the product, feature, or language was removed by opening the Add/Remove Programs dialog in the control panel.

Considerations before uninstalling:

Remove HADR or any other cluster before issuing uninstall using response file.

You have to check the log files after install or uninstall using response file to ensure its successful.

STEPS:

1. Copy the sample file to your  home directory or any other place

[root@redhat_1 samples]# pwd
/root/server/db2/linuxamd64/samples
[root@redhat_1 samples]# ls -lrt
total 324
-r--r--r--. 1 bin bin 54606 Dec  5  2012 db2ese.rsp
-r--r--r--. 1 bin bin 43383 Dec  5  2012 db2consv.rsp
-r--r--r--. 1 bin bin 27816 Dec  5  2012 db2client.rsp
-r--r--r--. 1 bin bin 54497 Dec  5  2012 db2wse.rsp
-r--r--r--. 1 bin bin 54897 Dec  5  2012 db2aese.rsp
-r--r--r--. 1 bin bin  9391 Dec  5  2012 db2un.rsp
-r--r--r--. 1 bin bin 43699 Dec  5  2012 db2exp.rsp
-r--r--r--. 1 bin bin 26371 Dec  5  2012 db2rtcl.rsp
[root@redhat_1 samples]# cp db2aese.rsp ~/db2aese.rsp 

I have saved it as custom_db2_install.rsp in my root home directory since i'm using root login.


2. Edit the file db2aese.rsp and add the below lines to it:

**PRODUCT TO INSTALL
PROD = ADVANCED_ENTERPRISE_SERVER_EDITION

**Base installation path
FILE = /opt/ibm/db2/V10.1

**LICENSE_AGREEMENT
LIC_AGREEMENT = ACCEPT

**PROGRESS BAR
INTERACTIVE = YES

**INSTALL TYPE
INSTALL_TYPE = TYPICAL


3. Save the file and exit.
4. Run the below command to verify content of response file.

./db2setup -l /tmp/custom_db2_install.out -r /root/custom_db2_install.rsp -c

The db2setup is available in /root/server/ directory, where I extracted my DB2 binaries.

[root@redhat_1 server]# ls -lrt
total 64
-r-xr-xr-x.  1 bin bin 5154 Dec  5  2012 db2prereqcheck
-r-xr-xr-x.  1 bin bin 5154 Dec  5  2012 db2setup
-r-xr-xr-x.  1 bin bin 5172 Dec  5  2012 db2_install
-r-xr-xr-x.  1 bin bin 5136 Dec  5  2012 db2ls
-r-xr-xr-x.  1 bin bin 5302 Dec  5  2012 db2_deinstall
-r-xr-xr-x.  1 bin bin 5190 Dec  5  2012 installFixPack
-r-xr-xr-x.  1 bin bin 5349 Dec  5  2012 db2ckupgrade
drwxr-xr-x. 28 bin bin 4096 Dec  5  2012 doc
drwxr-xr-x.  6 bin bin 4096 Dec  5  2012 db2
[root@redhat_1 server]#


5. After the verification completes successfully run the below command to install:

./db2setup -l /tmp/custom_db2_install.out -r /root/custom_db2_install.rsp

where,

-l = is the location of the installation log file, default will be under /tmp/db2*.log
-r = is the response file it should be given with the full path.

Response file key words explained:

**PRODUCT TO INSTALL
PROD = ADVANCED_ENTERPRISE_SERVER_EDITION

PROD is to choose which type of DB2 product needed, I installed Advanced server edition.

**Base installation path
FILE = /opt/ibm/db2/V10.1

FILE is the installation directory I have used the default installation path.

**LICENSE_AGREEMENT
LIC_AGREEMENT = ACCEPT

LIC_AGREEMENT is the license agreement.

**PROGRESS BAR
INTERACTIVE = YES

INTERACTIVE if you need to have progress information about installation then use it, when set to YES it will display progress to the screen just like doing a manual installation using db2_install script.

If you set that to NO there will be no output to the screen except the starting message of installation.

**INSTALL TYPE
INSTALL_TYPE = TYPICAL

INSTALL_TYPE is the installation type whether its TYPICAL or COMPACT or CUSTOM installation.

To find more details about response file installation search for response file keywords in information center or google.

_________________________________________________________________________________


DB2 UNINSTALLATION USING RESPONSE FILE:


Finding the DB2 products and features installed:

You can find the DB2 products and features installed using db2ls as follows:

The db2ls command is located under the /opt/ibm/db2/V10.1/install and /root/server/ run this from any path.

Use -p option to find the products installed.

Run ./db2ls -p -q -b /opt/ibm/db2/V10.1

[root@redhat_2 server]# ./db2ls -p -q -b /opt/ibm/db2/V10.1

Install Path : /opt/ibm/db2/V10.1

Product Response File ID                  Level   Fix Pack   Product Description
---------------------------------------------------------------------------------------------------------------------
ADVANCED_ENTERPRISE_SERVER_EDITION      10.1.0.2          2   DB2 Advanced Enterprise Server Edition


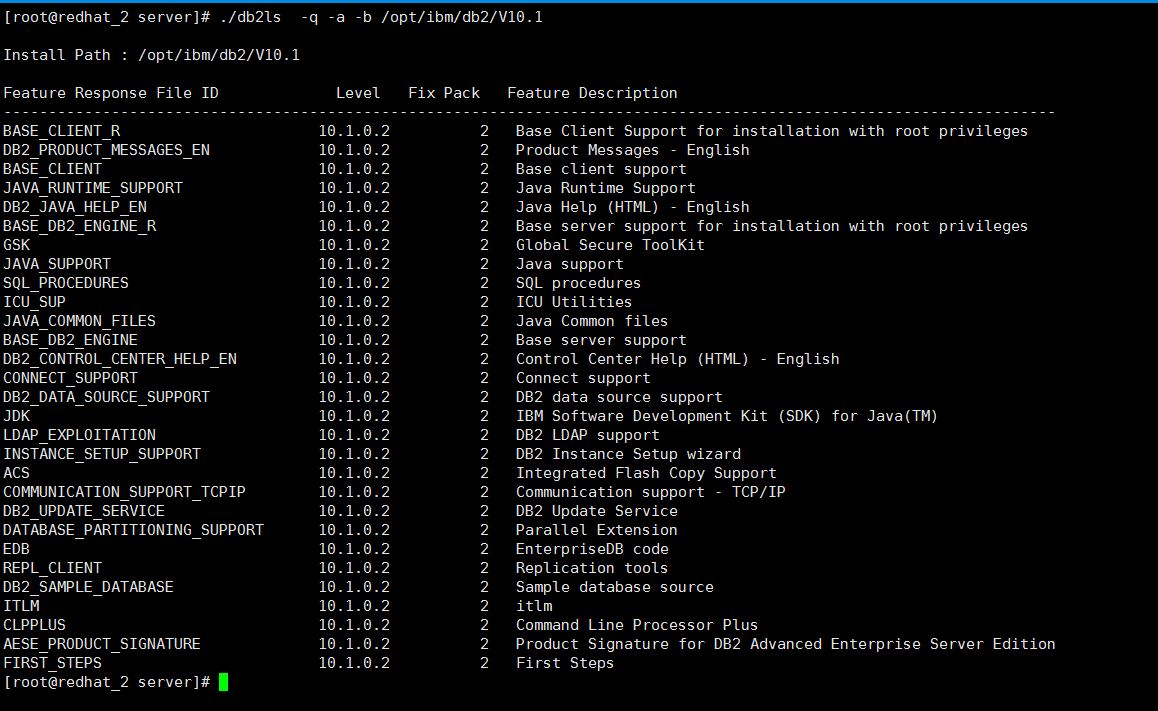
To list features and hidden components installed:

[root@redhat_2 server]# ./db2ls  -q -a -b /opt/ibm/db2/V10.1

Install Path : /opt/ibm/db2/V10.1

Feature Response File ID             Level   Fix Pack   Feature Description
---------------------------------------------------------------------------------------------------------------------
BASE_CLIENT_R                      10.1.0.2          2   Base Client Support for installation with root privileges
DB2_PRODUCT_MESSAGES_EN            10.1.0.2          2   Product Messages - English
BASE_CLIENT                        10.1.0.2          2   Base client support
JAVA_RUNTIME_SUPPORT               10.1.0.2          2   Java Runtime Support
DB2_JAVA_HELP_EN                   10.1.0.2          2   Java Help (HTML) - English
BASE_DB2_ENGINE_R                  10.1.0.2          2   Base server support for installation with root privileges
GSK                                10.1.0.2          2   Global Secure ToolKit
JAVA_SUPPORT                       10.1.0.2          2   Java support
SQL_PROCEDURES                     10.1.0.2          2   SQL procedures
ICU_SUP                            10.1.0.2          2   ICU Utilities
JAVA_COMMON_FILES                  10.1.0.2          2   Java Common files
BASE_DB2_ENGINE                    10.1.0.2          2   Base server support
DB2_CONTROL_CENTER_HELP_EN         10.1.0.2          2   Control Center Help (HTML) - English
CONNECT_SUPPORT                    10.1.0.2          2   Connect support
DB2_DATA_SOURCE_SUPPORT            10.1.0.2          2   DB2 data source support
JDK                                10.1.0.2          2   IBM Software Development Kit (SDK) for Java(TM)
LDAP_EXPLOITATION                  10.1.0.2          2   DB2 LDAP support
INSTANCE_SETUP_SUPPORT             10.1.0.2          2   DB2 Instance Setup wizard
ACS                                10.1.0.2          2   Integrated Flash Copy Support
COMMUNICATION_SUPPORT_TCPIP        10.1.0.2          2   Communication support - TCP/IP
DB2_UPDATE_SERVICE                 10.1.0.2          2   DB2 Update Service
DATABASE_PARTITIONING_SUPPORT      10.1.0.2          2   Parallel Extension
EDB                                10.1.0.2          2   EnterpriseDB code
REPL_CLIENT                        10.1.0.2          2   Replication tools
DB2_SAMPLE_DATABASE                10.1.0.2          2   Sample database source
ITLM                               10.1.0.2          2   itlm
CLPPLUS                            10.1.0.2          2   Command Line Processor Plus
AESE_PRODUCT_SIGNATURE             10.1.0.2          2   Product Signature for DB2 Advanced Enterprise Server Edition
FIRST_STEPS                        10.1.0.2          2   First Steps


There response file for uninstall can also be found under /opt/ibm/db2/V10.1/install.


1. Copy the db2un.rsp file to your location

[root@redhat_1 install]# pwd
/opt/ibm/db2/V10.1/install
[root@redhat_1 install]# ls -lrt
total 192
-r-xr-xr-x 1 bin  bin   9391 Dec  4  2012 db2un.rsp
-r-xr-xr-x 1 bin  bin  10688 Dec  4  2012 db2ls
-r-xr--r-- 1 bin  bin  16003 Dec  4  2012 db2_deinstall_exec
-r-xr--r-- 1 bin  bin  37857 Dec  4  2012 db2_deinstall
-r-xr-xr-x 1 bin  bin  20061 Dec  4  2012 db2chgpath
drwxr-xr-x 2 bin  bin   4096 Dec  4  2012 tsamp
-r-xr-xr-x 1 bin  bin  86009 Aug 18 04:43 db2ls_exec
drwxr-xr-x 2 root root  4096 Aug 18 04:44 logs
[root@redhat_1 install]# cp db2un.rsp ~/custom_db2_uninstall.rsp

2. Edit the custom_db2_uninstall.rsp and add the below lines:

**SELECT PRODUCT TO UNINSTALL:
REMOVE_PROD = ADVANCED_ENTERPRISE_SERVER_EDITION

**REMOVE ACS
REMOVE_COMP = ACS

**Application development tools
REMOVE_COMP              = APPLICATION_DEVELOPMENT_TOOLS


**Custom data source support
REMOVE_COMP              = CUSTOM_DATA_SOURCE_SUPPORT


** DB2 data source support
REMOVE_COMP              = DB2_DATA_SOURCE_SUPPORT

** Sample database source
REMOVE_COMP              = DB2_SAMPLE_DATABASE                 

** DB2 Update Service
REMOVE_COMP              = DB2_UPDATE_SERVICE                  

** First Steps
REMOVE_COMP              = FIRST_STEPS

** JDBC data source support
REMOVE_COMP              = JDBC_DATA_SOURCE_SUPPORT            

** IBM Software Development Kit (SDK) for Java(TM)
REMOVE_COMP              = JDK                                 

REMOVE_COMP              = LDAP_EXPLOITATION                   ** DB2 LDAP support
REMOVE_COMP              = ODBC_DATA_SOURCE_SUPPORT            ** ODBC data source support
REMOVE_COMP              = REPL_CLIENT                         ** Replication tools
REMOVE_TSAMP             = YES


Refer to the information center for uninstall response file keywords.

3. Run the uninstallation by using db2_deinstall command from the DB2 extract path:

For example:

I extracted DB2 at /root so I changed to the path /root/server/ and then issued the below command.

./db2_deinstall -r /root/custom_db2_uninstall.rsp -l /tmp/custom_db2_uninstall.out -b /opt/ibm/db2/V10.1


4. Check the log /tmp/custom_db2_uninstall.out for uninstallation details.


That's the end, Happy learning.

_________________________________________________________________________________

Saturday, August 22, 2015

Setting up rsh on two Redhat 6 servers

Setting up rsh on two Redhat 6 servers

Environment:

1. Two redhat 6 servers hostnames: 1. redhat_1, 2. redhat_2
2. Rsh packages required: rsh.x86_64, rsh-server.x86_64
3. IP address:
    redhat_1: 192.168.2.3 redhat_2: 192.168.2.4
4. Turn off the firewall and SElinux on both machines.

Introduction:

The rsh service comes under xinetd.

Steps:

Perform the below steps on both the machines..!!!!!!!


Turn off firewall and SELinux on both the machines as follows.

Links:

To turn off firewall:


1.  /etc/init.d/iptables - IPv4 iptables firewall service.
2. /etc/init.d/ip6tables - IPv6 iptables firewall service.

To disable firewall run the below command:

service iptables save
service iptables stop
chkconfig iptables off


Red Enterprise Linux Disable Iptables IPv4 Firewall

To turn off IP6 firewall:

# service ip6tables save
# service ip6tables stop
# chkconfig ip6tables off

To turn off the firewall service permanently:

[root@redhat_2 ~]# chkconfig iptables off

To check the fireall  service startup status:

[root@redhat_2 ~]# chkconfig --list iptables
iptables       0:off 1:off 2:off 3:off 4:off 5:off 6:off

To verify firewall is disabled or not:

/sbin/iptables -L -v -n

Turn off SELinux:

Link:

To turn off SELinux

http://www.cyberciti.biz/faq/howto-turn-off-selinux/


Disable SELinux temporarily:

setenforce 0

Disable SELinux permanently edit the below file:

vi /etc/sysconfig/selinux

Change the SELINUX parameter in the file:

SELINUX=disabled


REBOOT the machine for the effect to take place:

reboot

Finally setting up rsh environment:

Links:

http://people.redhat.com/kzak/docs/rsh-rlogin-howto.html
http://www.itzgeek.com/how-tos/linux/centos-how-tos/setup-remote-shell-access-on-centos-6-rhel-6.html

1. Install the rsh packages on both the machines if not installed already.

To check if installed already run:

yum list installed "*rsh*"

To install the packages:

yum install rsh.x86_64
yum install rsh-server.x86_64

Edit the rsh configuration file to enable rshd server daemon:

/etc/xinetd.d/rsh

Change disabled from Yes to NO if not set already.

disable                = no


Restart the xinetd service.

service xinetd restart

Editing  /etc/securetty on both the servers and include the below entries to the end:

rsh
rlogin
rexec

Creating .rhosts file:

The .rhosts file must be modified to include the names of the remote workstations, file should be under the home directory of the user who’s account is going to be used to execute the commands over a network.

vi ~/.rhosts

redhat_1
redhat_2

Make sure that .rhosts entries are pingable from both the servers, add the entries to /etc/hosts or DNS.

Creating hosts file:

Any user from the above systems can execute the command as root.

Add a full permission to use the command over the network. Plus sign will give a full permission.

vi /etc/hosts.equiv + +

Enable rsh, rlogin, rexec, xinetd services to start in boot:

chkconfig rsh on
chkconfig rlogin on
chkconfig rexec on

chkconfig xinetd on

Testing rsh:

Run the below command:

rsh redhat_2 uptime

[root@redhat_1 ~]# rsh redhat_2 uptime
 06:04:38 up  2:44,  4 users,  load average: 0.00, 0.00, 0.00


Tuesday, June 23, 2015

DB2 ADMIN_MOVE_TABLE

DB2 ADMIN_MOVE_TABLE

The ADMIN_MOVE_TABLE stored procedure moves the data in an active table into a new table object with the same name, while the data remains online and available for access. 

This stored procedure creates a protocol table composed of rows that contain status information and configuration options related to the table to be moved.

The return set from this procedure is the set of rows from the protocol table related to the table to be moved.

This stored procedure uses the following terminology:

  1. Source table :
    The original table name that is passed in as a parameter into the stored procedure. This is the table to be moved.
  2. Target table:
    A table created by the stored procedure using the table definition passed in through the stored procedure.
    All of the data from the source table is copied into this table and then it is renamed to the same name as the source table.
  3. Staging table:
    A table created by the stored procedure.The staging table stores any update, delete or insert changes that occur on the source table during the execution of the table move.

    This table is dropped when the move is complete.
Restrictions to the named table:
  • The table must have no reference constraints
  • The table must exist in the same schema as the source table
  • The table must be empty
  • No typed tables, materialized query tables (MQT), staging tables, remote tables or clustered tables are permitted
Options:

Keep:

This option keeps a copy of the original source table under a different name.

The ADMIN_MOVE_TABLE will remove the source table after moving by default ?
You can retrieve the exact name of the source table in the returned protocol table, under the ORIGINAL key. 

You may set this option at any point up to and including the SWAP phase.

COPY_USE_LOAD:

If you specify any load options for COPY_USE_LOAD, ADMIN_MOVE_TABLE uses an ADMIN_CMD load to copy the data from the source table to the target table.

If you do not specify any options for COPY_USE_LOAD, then the NONRECOVERABLE option the db2Load API is used to copy the data from the source table to the target table.

Messages on server:

Specifies that the message file created on the server by the LOAD command is to be retained in case of load failures.

The WARNINGS entry in the protocol table contain the message retrieval SQL statement that is required to retrieve all the warnings and error messages that occur during load, and the message removal SQL statement that is required to clean up the messages.

Note that with or without the clause, the fenced user ID must have the authority to create files under the directory indicated by the DB2_UTIL_MSGPATH registry variable.

COPY YES

Specifies that a copy of the loaded data will be saved. This option is invalid if forward recovery is disabled.

Use TSM:

Specifies that the copy will be stored using Tivoli® Storage Manager (TSM).

Open num Sessions:

Default is 1 one session.

NON RECOVERABLE:

Specifies that the load transaction is to be marked as nonrecoverable and that it will not be possible to recover it by a subsequent roll forward action.

If COPY YES is not used, NONRECOVERABLE is the default.

COPY_WITH_INDEXES:

This option creates indexes before copying the source table.

The default is to create the indexes after copying the source table.

Advantage of COPY_WITH_INDEXS:

The advantages of this option are that index creation after copying requires a whole table scan per index and that the index creation is a transaction that requires active log space.

Disadvantages:

If the logindexbuild database configuration parameter is on, significant log space is required for building the indexes in a short time frame.

Another disadvantage of this option is that copy performance is reduced because indexes need to be maintained on the target table.

Also, the resulting indexes many contain pseudo-deleted keys, and the indexes are not as well balanced as if the indexes were created after the copy.

You may set the COPY_WITH_INDEXES option at any point up to and including the COPY phase.

FORCE:

If the force option is set, the SWAP phase does not check to see if the source table has changed its table definition.

You may set this option at any point up to and including the SWAP phase.

NO_STATS:

This option does not start RUNSTATS or any statistic copying on the target table.

If you use the AUTO_RUNSTATS or AUTO_STMT_STATS database configuration parameters, DB2 will automatically create new statistics afterwards.

You may set the NO_STATS option at any point up to and including the SWAP phase.

COPY_STATS:

This option copies the statistics from the source table to the target table before performing the swap.

Advantages:

Setting this option saves computing time as RUNSTATS is not called to compute new statistics.

Also, the optimizer may choose the same access plans, because the statistics are the same.

Disadvantages:

This may cause inaccurate physical statistics, especially if the page size is changed.
Also, the optimizer may choose the same access plans, because the statistics are the same.

You may set the STATS_COPY option at any point up to and including the SWAP phase.

NO_AUTO_REVAL:

This option prevents automatic revalidation on the table, and instead, re-creates all triggers and views. 

The NO_AUTO_REVAL option can be set only in the INIT phase.

REORG:

This option sets up an extra offline REORG on the target table before performing the swap.

If you require an optimal XML compression dictionary, then REORG is the only method.

You may set the REORG option at any point up to and including the SWAP phase.

NO_TARGET_LOCKSIZE_TABLE:

This option does not keep the LOCKSIZE table option on the target table during the COPY and SWAP phases.

The default is to use the LOCKSIZE table option on the target table to prevent locking overhead, when no unique index is specified on the source table.

CLUSTER:

This option reads the data from the source table with an ORDER BY clause when a copy index has been specified using ADMIN_MOVE_TABLE_UTIL, a clustering index exists on the source table or a unique index or primary key is defined in the source table.

NON CLUSTER:

This option reads the data from the source table without an ORDER BY clause regardless of whether a copy index has been specified, a clustering index exists on the source table, or a unique index or primary key has been defined in the source table.

Note: When neither CLUSTER or NON_CLUSTER options are specified, ADMIN_MOVE_TABLE will read the data from the source table with an ORDER BY clause only when a clustering index exists on the source table.

LOAD_MSGPATH:

This option can be used to define the load message file path.

If the LOAD_MSGPATH option is not specified, then the default path is determined by the DB2_UTIL_MSGPATH registry variable.

LOAD_TEMPPATH:

Use this option to define the load temporary file path.

ALLOW_RLBAC:

Use this option to move a table that has row-level label-based access control (LBAC) security label specified. Before you use this option, ensure that you have adequate privilege; if you lack the privilege to access all the table row entries, data loss can occur.

HOW THIS UTILITY WORKS:

This input parameter specifies which operation the stored procedure is to execute.

There are two ways of calling the stored procedure: 

Using the MOVE command to execute all the operations at one time; 

By using the individual commands to execute the table move one step at a time.

Advantage of second method:

The main advantage of this second method is that you control when the SWAP phase actually occurs, thereby determining when the table is briefly taken offline. 

This allows you to make the move during a period of low system activity.

If you use the individual commands, they must be called in the following order:


  1. INIT
  2. COPY
  3. REPLAY
  4. VERIFY(optional)
  5. SWAP

  • MOVE: Performs the entire table move (INIT, COPY, REPLAY, and SWAP operations) in one step.
  • INIT: Verifies that a table move can take place, and initializes all of the data needed during the table move process (the target table, staging table, and the triggers on the source table).
  • COPY: Copies the content from the source table to the target table.
       
         Any updates, deletes, or inserts occurring on the source table during this time are captured and stored in the staging table.
         New indexes are created at the end of the COPY phase, unless the COPY_WITH_INDEXES option is selected.
          Also, if needed, secondary indexes are created on the source and target tables to improve performance during the REPLAY phase.
          COPY can be used only after the INIT phase has completed.
  • REDIRECT: Forwards changes directly to the target table instead of capturing the changes in the staging table.
  • REVERT: Reverts to the original behavior wherein the staging table captures the changes.
  • REPLAY: Copies into the target table any rows that have changed in the source table since the COPY phase began. REPLAY can be used only after the COPY phase has completed.
  • VERIFY: Optionally checks if the table contents of the source and target tables are identical.  VERIFY can be used only after the COPY or REPLAY phases have completed.
  • SWAP: Executes the REPLAY phase until the number of changes applied during the last scan of the staging table is less than the REPLAY_THRESHOLD value stored in the protocol table. The source table is then taken offline briefly to finish the final REPLAY, and then this command swaps the source table with target table and brings the table back online. SWAP can be used after the COPY phase has completed, but ideally after the REPLAY phase has been called.
  • CLEANUP: Drops the staging table, any non-unique indexes or triggers created on the source table by the stored procedure, and the source table if the KEEP option has not been set. CLEANUP can be called if the command failed during the SWAP phase.
  • CANCEL: Cancels a multi-step table move while between phases, or cancels a failed table move operation. Executing this command requires that the operation status is not in COMPLETED or CLEANUP state. CANCEL clears up all intermediate data (the indexes, the staging table, the target table, and the triggers on the source table).
AUTHORIZATION:

You must have SQLADM or DBADM authority to invoke the ADMIN_MOVE_TABLE stored procedure.

You must also have the appropriate object creation authorities, including authorities to issue the SELECT statement on the source table, and to issue the INSERT statement on the target table.

Default PUBLIC Privilege:

In a non-restrictive database, EXECUTE privilege is granted to PUBLIC when the procedure is automatically created.


Thursday, June 11, 2015

Upgrade to DB2 V9.7

Upgrade to DB2 V 9.7 

You can directly upgrade existing DB2 Version 9.5, DB2 Version 9.1, or DB2 UDB Version 8 instances and databases to DB2 Version 9.7. 


On Windows operating systems, you have an option to automatically upgrade an existing pre-Version 9.7 DB2 copy. If you choose to upgrade your existing DB2 copy during installation, you only need to upgrade your databases after installation.

If your DB2 servers are running on a release prior to DB2 UDB Version 8, migrate them first to DB2 UDB Version 8, and then upgrade to DB2 Version 9.7.

What happens during Instance and database upgradation:

Instance scope:

  • Upgrades an existing instance to a new instance under a DB2 Version 9.7 copy.
  • Upgrades instance profile registry variables. The global profile registry variables set by the user are not upgraded.
  • Upgrades the database manager configuration (dbm cfg) file.
  • Sets the jdk_path dbm cfg parameter appropriately.
  • Upgrades the db2audit.cfg audit configuration file when the audit facility is enabled.
  • Uses the SSLconfig.ini SSL configuration file to set the new database manager configuration parameters to the corresponding SSL parameter value in this file and upgrades the instance profile registry setting DB2COMM=SSL.
  • In a Microsoft Cluster Server (MSCS) environment, defines a new resource type, updates all DB2 MSCS resources to use the new resource type, removes the old resource type, and brings all resources online.
But I don't know what is the resource type in Microsoft Cluster Server.

Database directory scope:

When you access the database directory the first time, it is implicitly upgraded if necessary. The database directory is accessed when you issue commands such as LIST DATABASE DIRECTORY or UPGRADE DATABASE command.

Database upgrade:

When the database upgrade is called explicitly using the UPGRADE DATABASE command, or implicitly using the RESTORE DATABASE command from a pre-Version 9.7 database backup, the following database entities might be converted during database upgrade:
  • Database configuration file
  • Log file header
  • Table root page for all tables
  • Index root page for all tables
  • Catalog tables
  • Buffer pool files
  • History file

For recoverable databases, the UPGRADE DATABASE command renames all log files in the active log path with the extension .MIG. After you upgrade your databases successfully, you can delete all the S*.MIG files.

The UPGRADE DATABASE command upgrades the files SQLSPCS.1, SQLSPCS.2 , SQLSGF.1, and SQLSGF.2 to support new functionality on automatic storage table spaces such as removing storage paths from a database and rebalancing automatic storage table spaces after you add or drop storage paths from a database.

NOTE:  The files "SQLSPCS.1, SQLSPCS.2 , SQLSGF.1, and SQLSGF.2" are not tablespace containers they are files which contain meta data about the table spaces. These files are located under the database path directory, use the database snapshot to find these files.

The UPGRADE DATABASE command automatically collects statistics for all system catalog tables during database upgrade.

Restrictions:

  • Upgrading to a DB2 Version 9.7 non-root installation is supported from a DB2 Version 9.5 non-root installation. Upgrading to a DB2 Version 9.7 non-root installation from a pre-Version 9.7 root installation is not supported.
  • Restoring full database offline backups from pre-Version 9.7 DB2 copies is supported. However, rolling forward of logs from a previous level is not possible. Review Backup and restore operations between different operating systems and hardware platforms for complete details about upgrade support using the RESTORE DATABASE command.
  • When the DB2 Workload Manager feature is installed and you are upgrading from DB2 Version 9.1 or DB2 UDB Version 8, an upgraded database has three predefined default service classes: the default user class, the default maintenance class, and the default system class. After database upgrade, all connections belong to the default workload. Connections that belong to the default workload are mapped to the default user class. The default user class has only one service subclass: the default subclass. All activities from the connections in the default user class run in the default subclass.
  • In upgraded databases with the RESTRICT_ACCESS database configuration parameter set to YES, you must grant the USAGE privilege to non-DBADM users on SYSDEFAULTUSERWORKLOAD. Otherwise, these users are unable to submit any work to the database.
Disk space requirements for DB2 Upgrades:


Table space information files


The files SQLSPCS.1 and SQLSPCS.2 contain table space information. During upgrade from DB2 UDB Version 8 to DB2 Version 9.7, these files grow to four times their previous size but the total data size on disk does not exceed the new size of theSQLSPCS.1 and SQLSPCS.2 files. For example, if these two files have a total size of 512 KB before upgrade, you will need at least 2 MB of free disk space.


System catalog and system temporary table spaces
Ensure that you have sufficient free space on the system catalog and the system temporary table spaces for the databases that you are upgrading. System catalog table space is required for both old and new database catalogs during upgrade. The amount of free space required varies, depending on the complexity of the database, as well as on the number and size of database objects.


System catalog table space (SYSCATSPACE)


Increasing the total size to twice the total of used space is recommended. In other words the amount of free space should be at least the same as the current amount of used space.


Temporary table space (TEMPSPACE1 is the default name)
Increasing the total size to twice the total size of the system catalog table space is recommended.

For the system catalog table space, free pages should be equal to or greater than used pages. Total pages for the system temporary table space should be twice the amount of total pages for the system catalog table space.


9.7 Installation prerequisite:

Software and Hardware:
AIX Version 7.14
  • 64-bit AIX kernel is required
  • AIX 7.1.0 General Availability (GA)
  • Minimum C++ runtime level requires the xlC.rte 11.1.0.0 and xlC.aix61.rte 11.1.0.0 (or later) filesets. These filesets are included in the April 2010 IBM C++ Runtime Environment Components for AIXV11.1 package.
  • The minimum requirement for running DB2 Version 9.7 on AIX Version 7.1 is DB2 Version 9.7 Fix Pack 3 (V9.7.0.3).3

  • Additional considerations for POWER7 systems:
    • If you have IBM Tivoli® System Automation for Multiplatforms (SA MP) 2.2..x or SA MP 3.1.x Reliable Scalable Cluster Technology (RSCT) 2.5.4.0 installed, you require the SA MP3.1.0.6 special package with RSCT 2.5.4.2. Version 9.7 Fix Pack 2 and later fix packs include an updated version of SA MP which includes an RSCT level that supports POWER7 systems.
    • DB2 products running on POWER7 systems support Active Memory™ Expansion.
    • IBM Tivoli Monitoring for Databases: DB2 Agent (ITMA) is not supported on POWER7 systems.
    • For other considerations or to manually enable POWER7 support, see www.ibm.com/support/docview.wss?&uid=swg21420730.
  • 4To use the DB2 High Availability Feature, you need to apply Version 9.7 Fix Pack 3 or a later fix pack. These fix packs contain an updated version ofIBM Tivoli System Automation for Multiplatforms (SA MP).
Only 64 bit kernel is supported for AIX.

Disk requirements for UNIX and Linux:

/opt - Default installation path (/opt/IBM/db2/V9.7) needs minimum of 2 - 10 GB 
/tmp - 2 GB of free space in the /tmp directory is recommended.

Note: On Linux and UNIX operating systems, you must install your DB2 product in an empty directory. If the directory that you have specified as the install path contains subdirectories or files, your DB2 installation might fail.

Memory requirements:

1 GB is recommended.

Paging space requirements:

DB2 requires paging, also called swap to be enabled.

This configuration is required to support various functions in DB2 which monitor or depend on knowledge of swap/paging space utilization. 

A reasonable minimum swap/paging space configuration for most systems is 25-50% of RAM.

These higher requirements are due to virtual memory pre-allocated per database / instance, and retained virtual memory in the case of STMM tuning multiple databases.

 Additional swap/paging space might be wanted to provision for unanticipated memory overcommitment on a system.

JAVA software requirements:

SDK 6

Differences between ROOT and NON ROOT installations:

Unlike root users, non-root users cannot choose where DB2 database products are installed. Non-root installations are always placed in the $HOME/sqllib directory, where $HOME represents the non-root user's home directory. The layout of the subdirectories within the sqllib directory of a non-root is similar to that of a root installation.


Pre Upgrade tasks:

1. Ensure that you have at least one free page of index space per object index to eliminate the overhead of a potential index rebuild.

If an index root page does not have enough free space during upgrade, then the index will need to grow by one page. If a free page cannot be found in the index object, then a page will be requested from the tablespace. 

If the tablespace is full, then the entire index object will be marked invalid and will be rebuilt when the underlying table is accessed for the first time after upgrade.

2. If you use distributed transactions involving DB2 databases, ensure that the databases to be upgraded do not contain any indoubt transactions by using the LIST INDOUBT TRANSACTIONS command to get a list of indoubt transactions and to interactively resolve any indoubt transactions.

3. Convert type-1 indexes to type-2 indexes because type-1 indexes are discontinued in DB2 Version 9.7. Converting them before upgrade eliminates the overhead of index rebuild when you access tables using these indexes for the first time after upgrading to DB2 Version 9.7.

On UNIX or Linux operating systems, change to the $DB2DIR/bin directory where DB2DIR is the location that you specified during the DB2 Version 9.7 installation.

Run the below command:

db2IdentifyType1 -d database-name -o convert-t1-indexes-dbname.db2

If you have type-1 indexes, you will receive the following message: Type-1 indexes were found in the inspected tables.

The convert-t1-indexes-dbname.db2 command file contains REORG INDEXES ALL commands with the CONVERT parameter for each identified type-1 index.

Add a REORG INDEXES ALL command to the convert-t1-indexes-dbname.db2 command file for each root table with type-1 indexes, that you identified in the previous step, as shown in the following example:


REORG INDEXES ALL FOR TABLE table-name 
      ALLOW WRITE ACCESS CONVERT

If you have type-1 indexes, convert them to type-2 indexes by running the convert-t1-indexes-dbname.db2 command file:


db2 -tvf convert-t1-indexes-dbname.db2

4. Verify that databases are ready for DB2 upgrade to identify any problems before the actual upgrade. You must resolve them before you proceed with the upgrade.

Before you upgrade your databases, it is important to use the db2ckupgrade command to verify that your databases are ready for upgrade.

The db2ckupgrade command verifies that a list of conditions are true in order to succeed at the database upgrade. 

Also, this command writes to the log file, specified with the -l parameter, a warning message for a list of conditions that impact database upgrades.

Restrictions

In a partitioned database environment, to verify that your databases are ready for upgrade, you must run the db2ckupgrade command on each database partition.

If you do not run the db2ckupgrade command on each database partition, the db2iupgrade command could succeed even when one or more database partitions are not ready for upgrade. However, the database upgrade will fail.

1. Login as the DB2 instance user:

2. On UNIX or Linux operating systems, change to the DIRIMG/db2/OS/utilities/db2ckupgrade/bin directory where DIRIMG is the location where you uncompressed the DB2 Version 9.7 installation image or the directory where you mounted the DB2 product DVD, and OS is the operating system name of the DB2 server.

3. Run

db2ckupgrade sample -l db2ckupgrade.log -u adminuser -p password
    db2ckupgrade was successful.  Database(s) can be upgraded.

If you performed the Converting type-1 indexes to type-2 indexes pre-upgrade task, you can use the -not1 parameter to skip the check for type-1 indexes.

If the db2chkupgrade completes successfully then the databases can be migrated.

5. If you created user-defined data types using a name that is a system built-in data type name, drop these user-defined data types and re-create them using a different name that is not restricted. 

6. If you created database objects using restricted schema names, drop all the database objects that use reserved schema names and re-create them using a schema name that is not restricted.

7.Ensure that the log file for db2ckupgrade command contains the following text: Version of DB2CKUPGRADE being run: VERSION 9.7. This text confirms that you are running the correct level of the db2ckupgrade command.

8.Check and fix any invalid flavor fields on SQLSPCS files using the fixtbspflvr tool. Details about this tool can be obtained from http://www.ibm.com/support.

Backup database:

Disconnect all applications and users from the database.


db2 list applications

db2 force application all

Backup your database using the BACKUP DATABASE command.

db2 BACKUP DATABASE sample 

In partitioned database environments, back up all database partitions.

Optional: Test the integrity of a backup image to ensure that the image can be restored using the db2ckbkp Check Backup command. 

The following is an example on UNIX operating systems:

cd backup-dir

db2ckbkp SAMPLE.0.arada.NODE0000.CATN0000.20051014114322.001

   [1] Buffers processed:  #######

   Image Verification Complete - successful.


Backing up server configuration:

Collect information from your DB2 servers by running the db2support command for all your databases that you are going to upgrade in all your instances. 


db2support output-directory -d database-name -cl 0

The -cl 0 parameter collects the database system catalog, database and database manager configuration parameters settings, DB2 registry variables settings.

The information collected is stored in the db2support.zip compressed zip file under the output directory. 

A summary report in HTML format is included. In the db2supp_opt.zip file that is also included, you should check the optimizer.log file to verify that the collection of information was performed successfully.

Back up the information about all the packages for your applications associated with each database.

db2 LIST PACKAGES FOR SCHEMA schema-name
         SHOW DETAIL > /upgrade/sample_pckg.txt

or 

db2 LIST PACKAGES FOR ALL
         SHOW DETAIL > /upgrade/sample_pckg.txt

If you enabled the audit facility, back up the audit configuration of your instances by issuing the following command:

db2audit describe > audit_instance-name.cfg

To backup all external routines:

cp -R $INSTHOME/sqllib/function $INSTHOME/routine_backup

Use the GET DATABASE MANAGER CONFIGURATION command to back up your settings for database manager configuration parameters:

db2 GET DBM CFG > dbm_instname.cfg

The db2support command generates a file with the output of the db2look command for the specified database.

db2look -d sample -e -o sample_tbs.db2 -l -x

Use the db2setcommand to back up your DB2 profile registry variables settings and redirect the command output to a file to save these settings:
   db2set -all > reg_instname.txt

If you set DB2 environment variables, use the appropriate system command to list environment variables and their values. For example, on AIX® you can issue the following command:

   set |grep DB2 > env_instname.txt

Increasing the table space and log file sizes before upgrade:

Additional considerations are required in partitioned database environments to increase table space sizes because table spaces span across database partitions.

Use the below query to find the table space size:

db2 "SELECT SUBSTR(TBSP_NAME,1,15) NAME, TBSP_TYPE TYPE,
     TBSP_AUTO_RESIZE_ENABLED AUTO_RESIZE, TBSP_NUM_CONTAINERS CONTAINERS, 
     TBSP_TOTAL_PAGES TOTAL_PGS, TBSP_USED_PAGES USED_PGS, TBSP_FREE_PAGES FREE_PGS,
     TBSP_MAX_SIZE MAX_SZ, TBSP_PAGE_SIZE PG_SZ
     FROM SYSIBMADM.TBSP_UTILIZATION
     WHERE TBSP_CONTENT_TYPE IN ('ANY','SYSTEMP')"

If you have an SMS table space, ensure that you have at least the same amount of used pages available as free disk space; in this example, about 60 MB.

If you have a DMS table space and the number of used pages is greater than the number of free pages, use the following formula to calculate the number of pages to increase per container:

   number_of_pages = ( used_pages - free_pages ) /
                       number_of_containers_in_SYSCATSPACE

Then use the following command to increase the size of all containers in the system catalog table space:

   db2 "ALTER TABLESPACE SYSCATSPACE EXTEND (ALL number_of_pages)"

If you have a DMS table space with AUTORESIZE enabled and MAXSIZE is set to NONE, ensure that you have at least twice the amount of used pages available in free disk space. 

If MAXSIZE is set to an integer value that is less than twice the amount of used pages, then you need to increase MAXSIZE using the ALTER TABLESPACE statement:

db2 "ALTER TABLESPACE SYSCATSPACE MAXSIZE (2*used_pages_in_SYSCATSPACE*page_size/1024) K"

Increase the size of the temporary table spaces.

If you have an SMS table space you only need to ensure that you have at least twice the amount of total pages for the system catalog table space in free disk space;

If you have a DMS table space, use the following formula to calculate the number of pages to increase per container:

number_of_pages = ( number_of_total_pages_in_SYSCATSPACE  ) /
                       number_of_containers_in_TEMPSPACE1

Use the following command to increase the size of all containers in the temporary table space:

db2 "ALTER TABLESPACE TEMPSPACE1 EXTEND (ALL number_of_pages)"

Log space size requirements:

db2 UPDATE DB CFG FOR sample using LOGSECOND 
       (current_value of LOGPRIMARY + current_value of LOGSECOND) * 2

Gathering pre upgrade diagnostic data:

The gathering of this diagnostic information is done through the db2fodc -preupgade and db2support -preupgradecommands.

Taking DB2 server offline:

Stop the DB2 license service:

db2licd -end

Force all the applications:

db2 force application all

db2 terminate

db2stop


Upgrading DB2 Instance and Databases:

Before you begin:

Ensure that you have root access.

If a IBM® PowerHA® SystemMirror for AIX® cluster is running, you can not perform a IBM Tivoli® System Automation for Multiplatforms (SA MP) installation, upgrade or update because SA MPbundles Reliable Scalable Cluster Technology (RSCT) filesets that are dependent on PowerHA SystemMirror

To skip the SA MP installation use the db2setup command or the installFixPackcommand.

Upgrade instances:

db2 GET DBM CFG | grep 'Node type'
Node type = Partitioned database server with local and remote clients

The node type should be like "Partitioned database server with local and remote clients" 

db2stop force (Disconnects all users and stops the instance)
db2 terminate (Terminates back-end process)

Log on to the DB2 database server with root user authority on Linux and UNIX operating systems or Local Administrator authority on Windows operating systems and run:

$DB2DIR/instance/db2iupgrade [ -u fencedID ] InstName

The db2iupgrade command calls the db2ckupgrade command with the -not1 parameter to verify that the local databases are ready for grade.

The update.log is specified as the log file for db2ckupgrade, and the default log file created for db2iupgrade is /tmp/db2ckupgrade.log.processID.

On the HADR STANDBY server:

Ensure that the standby node is updated with the current instance information by performing the following actions:

Remove the old instance information from the standby database by issuing the following command on the standby node:

 new db2 upgrade path/bin/db2greg -delinstrec instancename=old_instance_name.

Add the new instance information to the standby database by issuing the following command on the standby node: new db2 upgrade path/instance/db2iset -a new_instance_name

Restart your instance by running the db2start command:

db2start

Verify that your instance is running on to DB2 Version 9.7 by running the db2level command

db2level

Upgrade databases:

Log on to the DB2 server as the instance owner or a user with SYSADM authority.

Optional: Rename or delete the db2diag log files so that new files are created. Also, remove or move to another directory any existing dump files, trap files, and alert log files in the directory indicated by the diagpath parameter.

Upgrade the database using the UPGRADE DATABASE command:

db2 UPGRADE DATABASE database-alias 

One of the most common causes of upgrade failure is that the log file space is not large enough, in which case the following error is returned:

SQL1704N  Database upgrade failed.  Reason code "3". 

If the UPGRADE DATABASE command returns the SQL1243W warning message, you need to drop or rename the SYSTOOLS.DB2LOOK_INFO table.

Verify your database upgrade is successful.Connect to the upgraded databases and issue a small query:

Post Upgrade tasks:

1. Adjust the log size to the previous size.
2. During database upgrade, all packages for user applications and routines are marked as invalid. You must rebind invalidated packages to take advantage of changes in the DB2® server and new statistics.

This procedure only applies to Embedded SQL database applications programmed in C, C++, COBOL, FORTRAN, and REXX.

db2rbind database-name -l logfile all 

3.Migrating explain tables.

db2exmig -d dbname -e explain_schema 
Adopting new functionality:

Enable Read only On Standby (ROS).

Reversing DB2 migration:

There is no utility to fall back to a previous release of DB2 database after upgrading your DB2 server.

This procedure applies only to DB2 server upgrade. It does not include DB2 clients.

In partitioned database environments you must perform this procedure on all participating database partition servers. If you have several database partitions on a partition server, execute tasks at the database level, such as backup and restore, on each database partition.
Procedure:

Log on to the DB2 server as a user with SYSADM authority.
Drop all databases in DB2 Version 9.7 by running the DROP DATABASE command.
Log on to the DB2 server as root on Linux and UNIX operating systems or a user with Local Administrator authority on Windows operating systems.
Drop your DB2 Version 9.7 instances by running the db2idrop command. This command does not remove the database files; you need to drop your databases before dropping your instances.
If you upgraded your pre-Version 9.7 instances to DB2 Version 9.7, re-create your instances in the pre-Version 9.7 by running the db2icrt. Then restore the database manager configuration parameter values for each instance using the UPDATE DATABASE MANAGER CONFIGURATION command.
For each pre-Version 9.7 instance, log on to the DB2 server as the instance owner and restore your upgraded databases from a pre-Version 9.7 offline full backup by running the RESTORE DATABASE command. You cannot upgrade your databases from DB2 Version 9.7 to pre-Version 9.7 release.
If you have recoverable databases and you want to rollforward through the log files you had before the upgrade, rename all the S*.MIG files in the active log path using the .LOG extension and issue the ROLLFORWARD DATABASE command.


Upgrading DB2 Clients:

Backing up client configuration:

Backup client database manager configuration:

db2 GET DBM CFG > D:\upgrade\dbm_client.cfg

Back up the information of cataloged databases by running the db2cfexp command to create a configuration profile:
db2cfexp cfg_profile BACKUP
Ensure that you have root user authority.

Log on to the system with root user authority.

Upgrade your existing client instances by running the db2iupgrade command:

$DB2DIR/instance/db2iupgrade InstName

Post upgrade tasks:

1. Recatalog nodes and databases.

2. Manage changes in DB2 server behavior by modifying your settings where required. There are new registry variables, new configuration parameters, and new default values for registry variables and configuration parameters introduced in DB2 Version 9.7 that can impact the behavior of your application.
3.Verify that upgrading your clients was successful.


By connecting to the database.